Saturday, August 27, 2011

Toys of Brutality (part2)

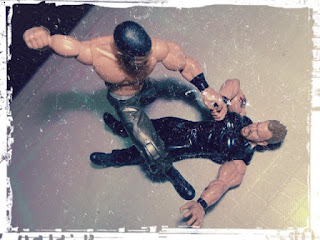
The last 'Toys of Brutality' series was successful, My son and I decided to give it a go one more time. This time, with more ferocity, with more brutality...


"I'm gonna shove this way up yer spinktah..."


Back breaker


A view from the door peephole


My fist...you face (advanced edition)


"Viscera Stomping Boots... Lobo style"


"Curb stomping!!! Yeah!!!"


"Its about time your face met my boot!!!"


============================
MUSIC OF BRUTALITY
============================


============================


The guys after a tiring day of photo shoot


Makeshift Flash Diffuser

I saw in one online resource that almost any translucent object can be turned to a flash diffuser or filter. In one example, they used an empty carton of cigarettes as a diffuser.

I made one just like it. but with a few alterations


While the cigarette box in that webpage was closed, I put a little hole on the top to act as a reflector.

When the cardboard was closed, the resulting shot was red. That means the other colors of the spectrum was not getting out. That's why I added the hole, to reflect the other colors upward providing the hues needed to make the flash white.

In outdoor ambient lighting, the flash appears 'cream' or off white. In total darkness, it shoots off an orange, reddish tone.

Well, still needs more work.

(using ordinary flash)

(with my home made diffuser)


Tuesday, August 23, 2011

Toys of Brutality

I got a hold of some of my son's WWE action figures. We then posed them, then I got the idea to take pictures...mostly using the built-in macro settings to give the focus on the action and the action figures. Spice them up using Pixlr's Pixlr-o-Matic to give it a rugged, warped, pulp fiction feel to it.

("Who's next?")


("MY FIST...YOUR FACE...")


("Take your face pounding like a man...")


("MY FIST...YOUR FACE..." ver.2.0)


Flash Diffusers

Sometimes you see those little translucent plastics covering the flash component of a camera. That is called a diffuser. It scatters the light from the flash bulb, giving off a softer tone.

(without a diffuser, the light is very direct and intense, not good for portraits)

(picture taken with a make-shift flash diffuser)

You can use a variety of plastics to use as a diffuser as long as its translucent. For this photo, I used a DVD case that was white and translucent.


Wednesday, August 17, 2011

Another Cool Effects Editor from Pixlr


Those wunder guys from Pixlr is out with another cool effects tool... this time, it helps you make faux-vintage photos.

I don't know if this was here for a long time, since I use the Pixlr editor and Pixlr Express exclusively, but this 'new' thing I found on their website is sure to add another dimension to your creativity and artistic sense.

Its called the 'Pixlr-O-Matic'.

For those who don't know yet, Pixlr provide quality image editing tools that are online and easy to use. If you can use MS Paint or Adobe's Photoshop, you can definitely use the Pixlr Editor for your basic photo editing needs. And for the creative ones, Pixlr Express has a lot of effects and tools available to jazz up your photo.

Pixlr-O-Matic has a 3 step process to enhance your photo. The first step is applying the effects, which are almost the same feature you can see with Pixlr Express, and more. The second step is superimposing digital damage, watermarks or scratches or such, to your photo. The last step is laying in the frame...either using damaged edgings, or stylized boarders, its up to you to decide.

============ samples =============


Monday, August 15, 2011

Random Pics

(can someone please teach me the correct settings or how to shoot a dusk scene)

("...here's lookin' at you kiddo...")

(hehehehe...pipes...)

Sunday, August 14, 2011

Recover Deleted Files from your USB Devices

I like to keep my camera's memory clean. Every shooting day, I immediately transfer my files to the PC then delete the ones in the camera.

But most cameras store their files of different folders, which makes it hard for you to track down. Like a moment ago, I accidentally deleted my movie files after transferring my photo files. I happened a lot in the past, and although I resolved to be more careful, you still tend to slip up from time to time.

No problem, right? just look in the Recycle Bin. But the Recycle bin doesn't cover USB drives, removable drives and network drives, so really have to be careful with these kinds of file management.

In comes a downloadable freeware from the good guys at Pandora Recovery.

They have free version that specializes in recovering media files, which is good for your USB DSLRs, digital cameras, bridge cameras, and so on.

So keep this wonderful and useful program afloat by donating to their website.

Saturday, August 13, 2011

Shutter experiments and then some...

(using one of the fun scene settings on the X500 called the 'Sketch Mode')

(shutter priority test at night)

taken by my wife, while I was staring into nothingness
(using the X500's panoramic shot mode)

But using the X500 at night, in the dork, shows the X500's weakness when it comes to low light level photography. Up close, these pictures are pixelized with color dithering in dark areas. Indicating that the sensor is overcompensating for light.

Tuesday, August 9, 2011

Dark Shoot Fun with GE X500: Cigarette on Ashtray

A simple play with the X500's shutter and aperture in a dark setting. Setting the shutter speed at 10 seconds, the exposure to -2.0 and the aperture ratio to 6.0, I laid my pitch black shirt on the floor, turned off all the lights and let the camera got to work. While the shutter is open, I shined a small penlight moving across in a rapid pace for about 3 seconds and lighted the other two parts on a 3 to 4 second interval.

I originally wanted to capture the smoke rising from the ember, but I ended up with a glowing ember shot instead.


(Goverment Warning: Cigarette smoking is dangerous to your health)

Monday, August 8, 2011

G.E. X500


After the unfortunate demise of my Canon 1000D, it took a while before I could find a replacement. I was looking for the compact, price and easyness of a point-and-shoot camera with the basic features I need from a SLR.


Then I saw the GE X500, a bridge camera preceeded by the GE X5. It offers the ease and functionality of a point-and-shoot camera, while offering some SLR features like Apperture Priority, Shutter Priority, Program Priority and the Manual Mode. Its a slight upgrade from the previous X5, with a boosted pixel capacity (16.1 megapixels) and added scene settings. And let me tell you, the added scene settings are pretty wicked (teeheeee).

It has all the preset shooting features you can expect from a digital camera, save for the function knob which looks like the one on DSLR's. That is because aside from the before mentioned shooting priorities, the Manual mode lets you play with the shutter speed, ISO and apperture ratio at the same time, same as a low end DSLR, which makes it a good teaching tool for learning about such basic photography concepts for its price.

It has a compact design, much like a stubbed SLR, but light and easy to carry. Its saves a lot on carrying all those other components and lens. The built in lens is a cool 27mm wide angle to 405mm, giving you a wide range of focus and range to play with. Problem with the lens design is its unsightly, like it didn't belong with the rest of the body. While the body is short and stubby, the thin lens protrude from the body. Another problem is with the small frame and all parts built so close together, the lens latch on to the lens cap cable, or the shoulder strap, or my long hair, as it retracts back into the body.


The package includes the camera, 4Gb SD card, straps, camera bag, 4-AA alkaline batteries, 4-AA 1000mA rechargable batteries, battery charger, USB cable, program CD and a Dickies backpack. The X-5, the X500's predecessor, has a Motorola ROCKR as a freebie (maybe I should have gotten the X-5 instead...), and still does. The CD that goes along with it is not a USB driver but a bunch of ArcSoft support programs that makes using your camera easier. Directly plug it to your computer and it reads it as a portable drive, even on the Windows 7 OS.


On the downside, you can't adjust the exposure setting while in Manual mode, which leads to some pretty burned out shots on some of my long exposure daylight pictures. Memory and processing is a bit slow, so you can't seem to take one picture after another in a swift manner.

Entering the preview mode while the camera is writing or processing the image may lead to the picture not saving at all (leading to a broken file).

Focal distance change is hardly noticable. Sometimes its better to just use the Macro setting to blur out the background than changing the apperture variable.

And like other point-and-shoot cameras, it is weak in low lighting conditions.

But if you are looking for a starter camera without dishing out your son's highschool tuition, or a hobbyist looking for a compact alternative, the GE X500 is definitely a good choice.

===================================================

(outdoor shot using the 27mm wide angle setting)
(macro setting)
(framed scene setting)

(Panoramic Function)

(Sketch Scene Setting...nice. That's my wife, and no, that's not a real gun she's pointing at me)

Sunday, August 7, 2011

ISO

ISO is one of the photography basics which refers to the light sensitivity of the image sensor of your DSLR. ISO stands for International Standards Organization, a name which carried on from the days when film was used.

The lower the ISO, the lower the light sensitivity, therefore, the darker the image. So in outdoor sunny shots, ISO60 or 80 is recommended. On the other hand, the darker indoor shots would need higher ISO. You can use lower ISO's in darker settings provided you use some form of flash or external lighting.

Here's the catch; the higher ISO you go, the higher the noise volume would be. That would mean a grainier image. So it is recommended to keep your ISO as low as possible and adjust only as needed.


(The image on the left uses ISO100 while the image on the right uses ISO400. You can notice the increase in noise in the close up as the ISO increases. Good thing about Automatic Modes is that shutter speed and exposure settings adjust as you change the ISO when using ISO priorities)